Data Annotation in MVC

Introduction
In the previous article, you learned about what is Dependency Injection and how can we achieve this in the MVC application.
In this article, you will learn about what is data annotation, types of data annotation and, how can we use them in MVC Project.
This article will be helpful to beginners and students who are learning MVC
Pre-requisites
- You need to create an ASP.NET MVC Project (You can refer to our article to create a new project), Or you can add this to the existing project also A SQL server is Installed where you can create a database.
- An empty Database was created on the SQL server.
What is Data Annotation?
Data annotations are attributes that can be applied to classes or class members to specify the relationship between classes and property data. it describes how the data is to be displayed in the UI, and it specifies validation rules if any.
Data annotation is one type of validation that we put in our models to validate the input from the users.
In ASP .NET MVC we can validate the models using the Data Annotation attribute, which is a unique feature of ASP .NET MVC.
To use the data annotation in MVC System.ComponentModel.DataAnnotations namespace is needed to be imported.
It’s very easy to apply and use in MVC applications and also has less code to write as compared to any other validations.
Types of Data Annotations in ASP.NET MVC
There are many times of data annotations like Required, DataType, RegularExpression, Range, StringLength, DisplayName, and MaxLength.
Required
This is used to make user input mandatory. And it can not be skipped.
[Required(ErrorMessage="Please enter first name"),MaxLength(30)]
public string FirstName {get;set;}
Range
This is used to give a range on any model property between two numbers.
[Range(1,100,ErrorMessage="Please enter correct value")]
public decimal Percentage {get; set;}
DataType
This is used to specify the data type of the model property.
[DataType(DataType.Text)]
public string FirstName {get;set;}
StringLength
This is used to specify the maximum and minimum length of the property.
[StringLength(30,ErrorMessage="Do not enter more than 30 characters")]
public string FirstName {get;set;}
DisplayName
Using this attribute we can specify the property name to be displayed on the view.
[Display(Name="Student Name")]
public string Name {get;set;}
MaxLength
This is used to specify the maximum length of the property.
[MaxLength(3)]
public int Volume {get;set;}
DisplayFormat
This is used to set the date in the format specified as per the attribute.
[DisplayFormat(DataFormatString = "{0:dd.MM.yyyy}")]
public string DOB {get;set;}
RegularExpression
This is used to set a regex pattern for the property of the model.
[RegularExpression(@"^\w+([-+.']\w+)*@\w+([-.]\w+)*\.\w+([-.]\w+)*$", ErrorMessage = "Email is not valid.")]
public string Email {get;set;}
How to use Data Annotation in MVC?
Lets take a registered Employee form as an example and see how data annotation works in that form.
Step 1 :
Create a model called “EmployeeModel” as shown in the below code snippet and also see how the data annotations are used on those model properties.
EmployeeModel.cs
public class EmployeeModel
{
    public int Id { get; set; }
    [Required(ErrorMessage="Please enter First Name"), MaxLength(15)]
    public string FirstName { get; set; }
    [Required(ErrorMessage = "Please enter Last Name"), MaxLength(15,ErrorMessage ="Name must be shorter then 15 char")]
    public string LastName { get; set; }
    [Required(ErrorMessage = "Date of Birth is Required"),DisplayFormat(DataFormatString = "{0:dd.MM.yyyy}"), Display(Name = "Date Of Birth")]
    public DateTime DOB { get; set; }
    [Required(ErrorMessage ="Please Enter Email"), RegularExpression(@"^\w+([-+.']\w+)*@\w+([-.]\w+)*\.\w+([-.]\w+)*$", ErrorMessage = "Email is not valid."), DataType(DataType.EmailAddress)]
    public string Email { get; set; }
    [Required(ErrorMessage ="Salary is Required"),MaxLength(5,ErrorMessage ="Salary Length should be less then 6 digit")]
    public int Salary { get; set; }
    [Required(ErrorMessage ="Phone Number is required"),DataType(DataType.PhoneNumber)]
    public int PhoneNumber { get; set; }
}
Step 3:
Add a method in the controller to display the registration form and also add one save method to save data in the database as shown below.
Home.cs
public class HomeController : Controller
{
    public ActionResult Index()
    {
        return View();
    }
    public ActionResult Add()
    {
        EmployeeModel model = new EmployeeModel();
        return View(model);
    }
    [HttpPost]
    public ActionResult Add(EmployeeModel model)
    {
        using (var dBContext = new EmployeeDataEntities())
        {
            Employee datamodel = new Employee();
            datamodel.FirstName = model.FirstName;
            datamodel.LastName = model.LastName;
            datamodel.DOB = model.DOB;
            datamodel.Salary = model.Salary;
            datamodel.PhoneNumber = model.PhoneNumber;
            datamodel.Email = model.Email;

            dBContext.Employees.Add(datamodel);
            dBContext.SaveChanges();
        }
        return RedirectToAction("Index");
    }
}
Step 3 :
Right-click on the Add method and add a view and replace the below code in the view file.
Add.cshtml
@model EmployeeManagement.Models.EmployeeModel
@{
    Layout = "~/Views/Shared/_Layout.cshtml";
}

<div class="card">
    <div class="card-header">
        <h1 class="text-center">Add Employee</h1>
    </div>
    @using (Html.BeginForm("Add", "Home", FormMethod.Post, new { name = "EmployeeForm" }))
    {
        <div class="card-body">
            @Html.AntiForgeryToken()
            <div class="row">
                <div class="col-md-12">
                    @Html.ValidationSummary(true, "", new { @class = "text-danger" })
                    @Html.HiddenFor(m => m.Id)
                    <label class="col-form-label col-md-2 col-md-offset-2 form-control-sm">First Name</label>
                    <div class="form-group row">
                        @Html.TextBoxFor(m => m.FirstName, new { @class = "form-control  form-control-sm required", name = "EmpName" })
                        @Html.ValidationMessageFor(m => m.FirstName, "", new { @class = "text-danger col-form-label" }
                        <div class="col-md-8">
                            <label class="col-form-label col-md-2 col-md-offset-2 form-control-sm">Last Name</label>
                            @Html.TextBoxFor(m => m.LastName, new { @class = "form-control  form-control-sm required", name = "EmpName" })
                            <div class="col-md-8">
                                @Html.ValidationMessageFor(m => m.LastName, "", new { @class = "text-danger col-form-label" })
                        </div>
                    </div>
                    <div class="form-group row">
                        <label class="col-form-label col-md-2 col-md-offset-2 form-control-sm">Birth Date</label>
                        <div class="col-md-8">
                            @Html.TextBoxFor(m => m.DOB,"{0:dd/MM/yyyy}", new { @class = "form-control form-control-sm datepicker", @AutoComplete = "off", name = "EmpDOB" })
                            @Html.ValidationMessageFor(m => m.DOB, "", new { @class = "text-danger col-form-label" })
                        </div>
                    </div>
                    <div class="form-group row">
                        <label class="col-form-label col-md-2 col-md-offset-2 form-control-sm">Email</label>
                        <div class="col-md-8">
                            @Html.TextBoxFor(m => m.Email, new { @class = "form-control form-control-sm", @AutoComplete = "off" })
                            @Html.ValidationMessageFor(m => m.Email, "", new { @class = "text-danger col-form-label" })
                        </div>
                    </div>
                    <div class="form-group row">
                        <label class="col-form-label col-md-2 col-md-offset-2 form-control-sm">Salary</label>
                        <div class="col-md-8">
                            @Html.TextBoxFor(m => m.Salary, new { @class = "form-control form-control-sm", @AutoComplete = "off"})
                            @Html.ValidationMessageFor(m => m.Salary, "", new { @class = "text-danger col-form-label" })
                        </div>
                    </div>
                    <div class="form-group row">
                        <label class="col-form-label col-md-2 col-md-offset-2 form-control-sm">Phone Number</label>
                        <div class="col-md-8">
                            @Html.TextBoxFor(m => m.PhoneNumber, new { @class = "form-control form-control-sm", @AutoComplete = "off"})
                            @Html.ValidationMessageFor(m => m.PhoneNumber, "", new { @class = "text-danger col-form-label" })
                        </div>
                    </div>
                    <div class="form-group row">
                        <div class="col-md-2">
                        <div class="col-md-2 col-md-offset-6 form-control-sm">
                            <button type="submit" class="btn btn-primary">Save</button>
                            <button type="button" class="btn btn-primary">Cancel</button>
                        </div>
                    </div>
                </div>
            </div>
        }
    </div>
</div>
@section scripts
{
    @Scripts.Render("~/bundles/jqueryval")
    $(document).ready(function () {
        $('.datepicker').datepicker({ format: 'mm/dd/yyyy' });
    });
}
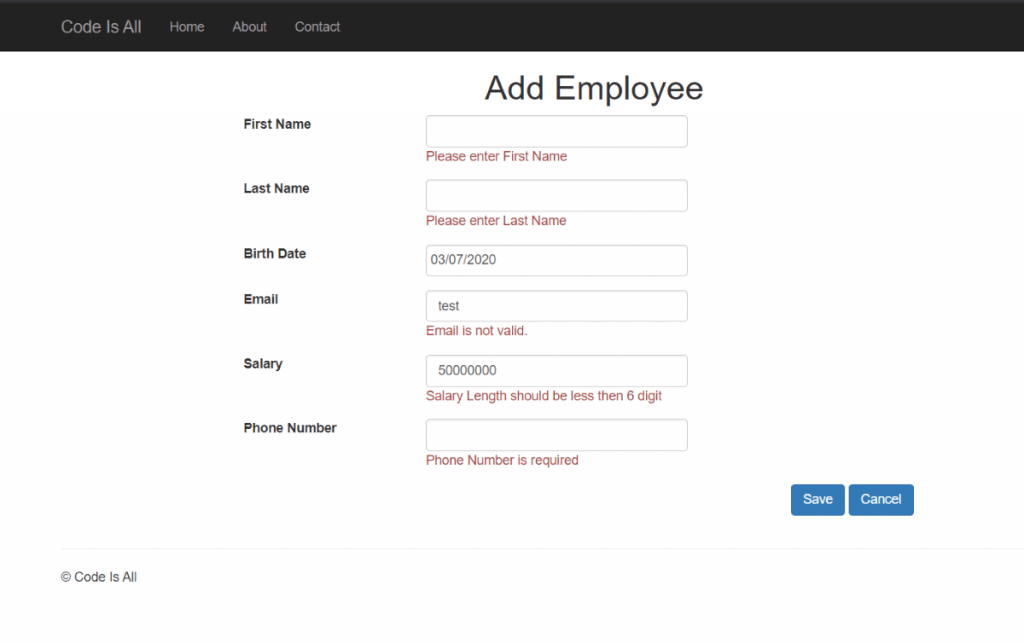
Then run the project and you will see the below form, now create you can test the validations as i have tested below.
I hope this article will help you to learn about data annotations and how to use them in MVC applications. we will be happy to help you if you have any issues or queries. Comment your suggestions and issues and we will try to resolve them.