Code-First Approach With ASP.NET MVC Project
Introduction
In the previous article, you have learned about the difference between Code-First and Database-First approaches.
In this article, you will learn how to establish a SQL Server database connection to MVC 5 applications with the help of the Code First approach, and connect SQL databases to perform operations in a project.
This article will be helpful to beginners and students who are learning MVC.
What is Code First Approach?
Code-First approach is an alternative of the database first and model first approaches to the entity data model and create a database as per the model we create.
In a simple way, Code-First we create the model classes as per the tables in the database we want to create. And in the Database-First approach, we create the database first, and then the model class of the table will be generated automatically when we .edmx file generates.
To know more about the code-first and Database-first approach visit our previous article.
Pre-requisites
- You need to create an ASP.NET MVC Project (You can refer our article to create a new project), Or you can add this into the existing project also A SQL server Installed where you can create a database.
- An empty Database created on the SQL server.
Update Empty Database with Code-First
Step 1: Add new class library to solution
As you have already a demo project created we will add a class library to the solution to separate the data logic from the project, so it gets easy to maintain in the future.
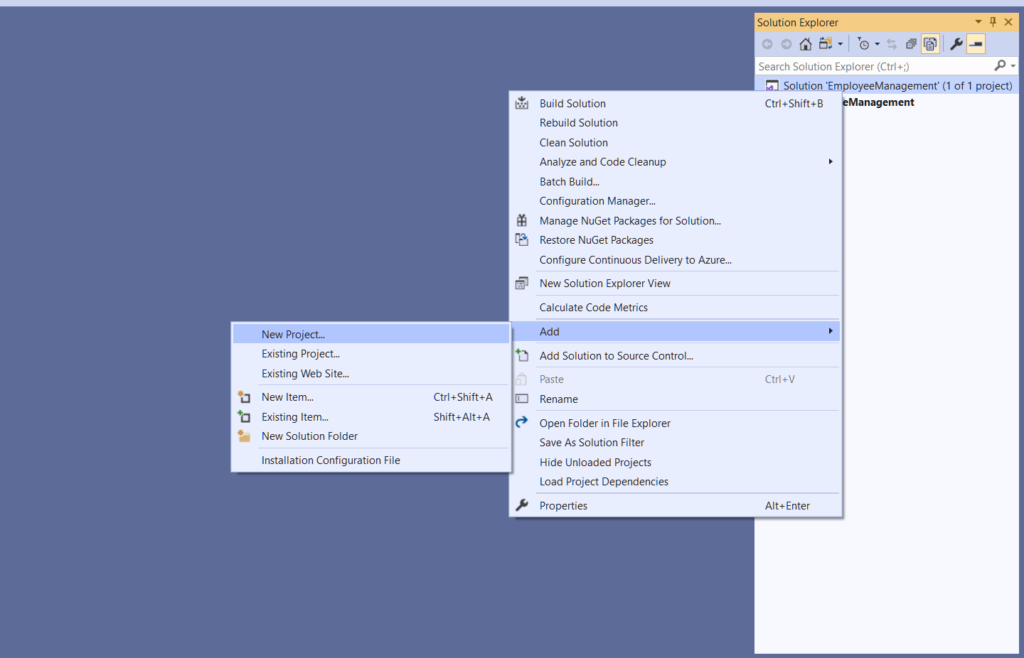
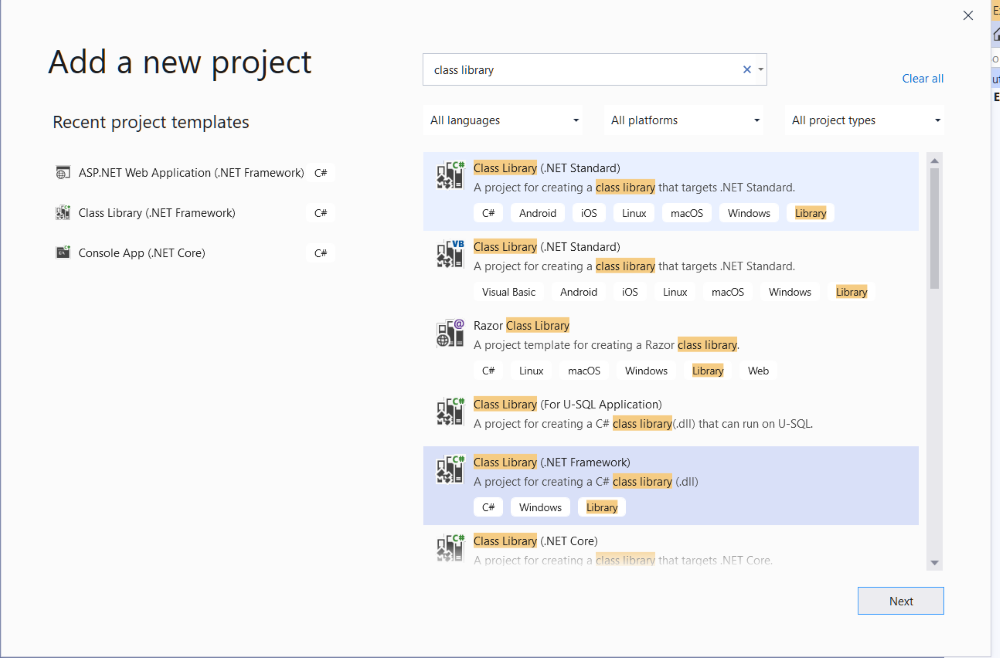
Add the class library right-click on the solution and add a new project as shown below.
You will get the window like the below image, select the class library (.NET framework), and hit the next button.
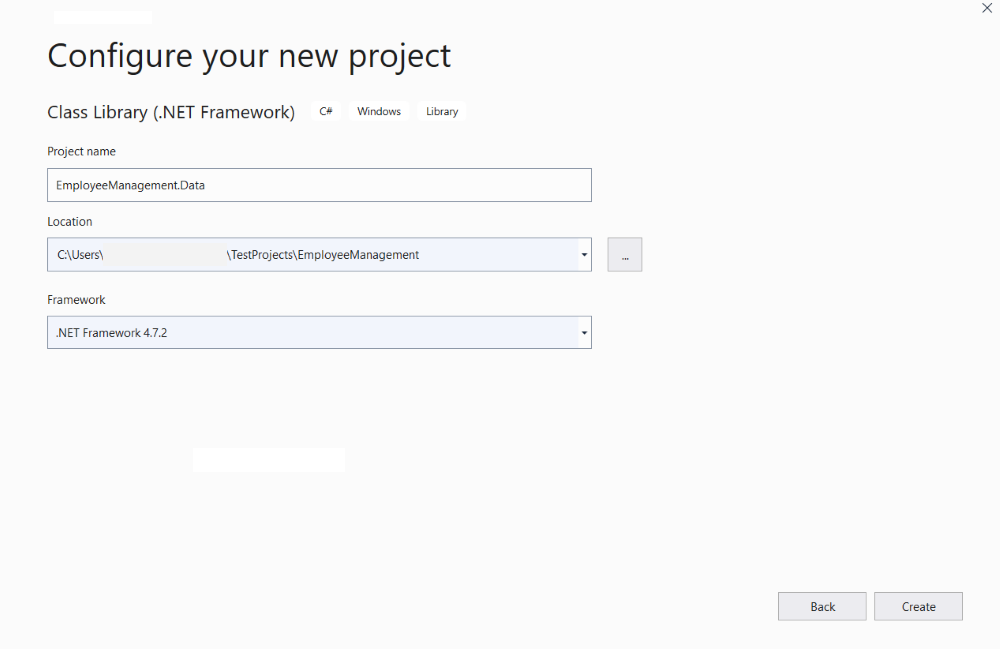
Give the appropriate name of the project as I have given here and hit the create button as shown in the image below.
Step 2: Add entity framework to the project
Go to the NuGet Package Manager Console and run the below code to install the entity framework in the project.
Install-Package EntityFramework
Step 3: Create an Entity for Employee
In the EmployeeManagement.Data project create a folder and name it “Model” and add a new class called “Employee.cs” under that folder and add the below code to the class.
public class Employee
{
    [Key]
    public int Id { get; set; }
    public string Name { get; set; }
    public string Department { get; set; }
    public DateTime DOB { get; set; }
    public virtual ICollection EmployeeSalaries { get; set; }
}
After creating the class for the table, you have to create a context class in the model folder, name it “EmployeeDBContext.cs” ( In database-first approach it creates automatically when .edmx file creates). Add the below-given code in that class.
public class EmployeeDBContext:DbContext
{
    public EmployeeDBContext() : base("EmployeeDBContext")
    {
    }
    public DbSet Employee { get; set; }
}
Step 4: Enable Migration
After adding the entity class and the context class very important step is to enable the migration in the project.
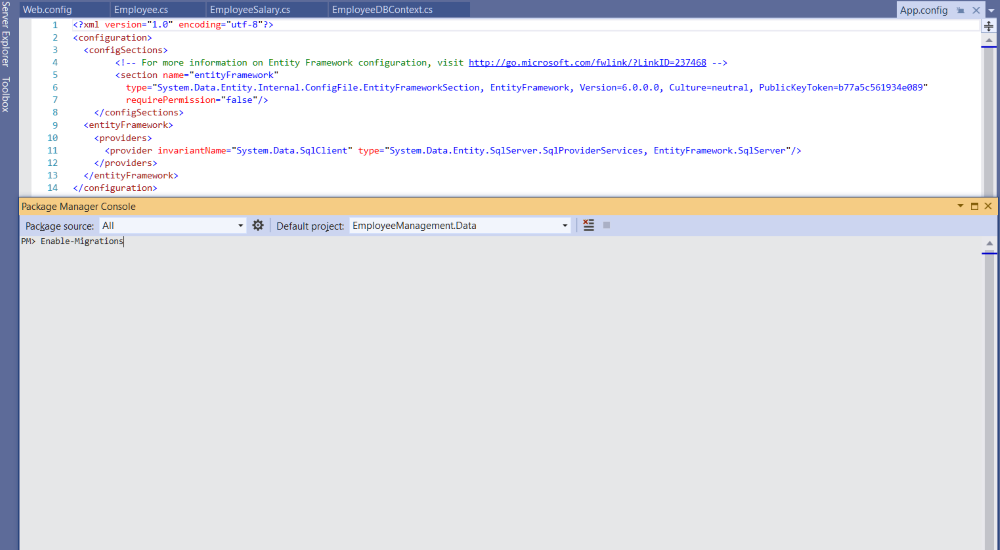
To enable migration open NuGet package manager console and select the project where your entity classes are held (in our case EmployeeManagement.Data) and run below code as shown.
Enable-Migration
Step 5: Add-Migration and update base
To add the migration and update the database run below command one by one and it will create one folder named “Migrations” in the project and the migration file will be in that folder.
- add-migration addDB
- update-database
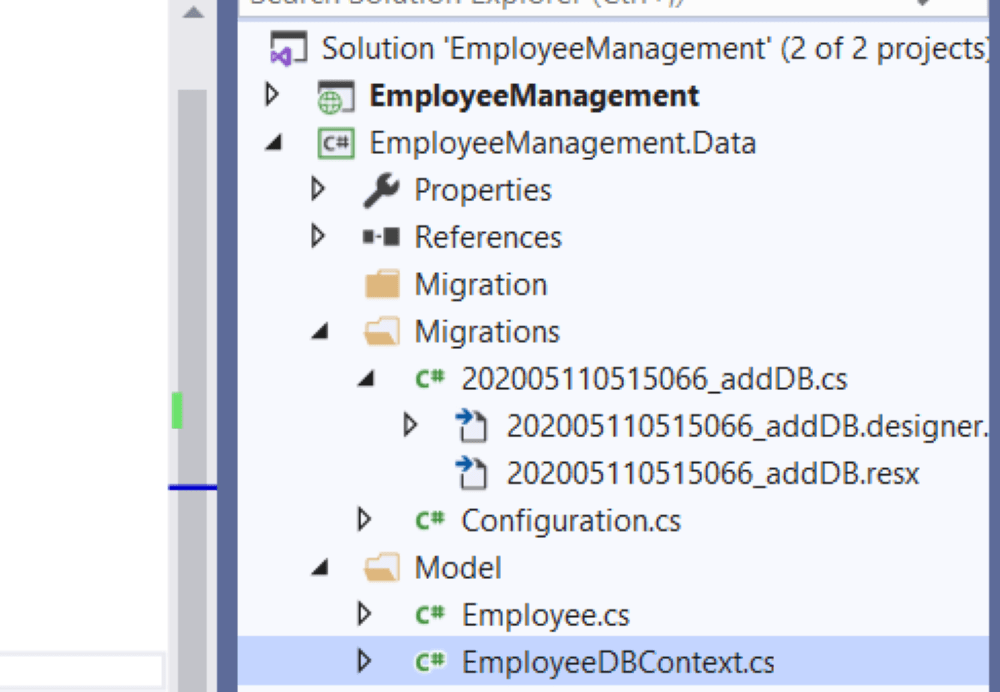
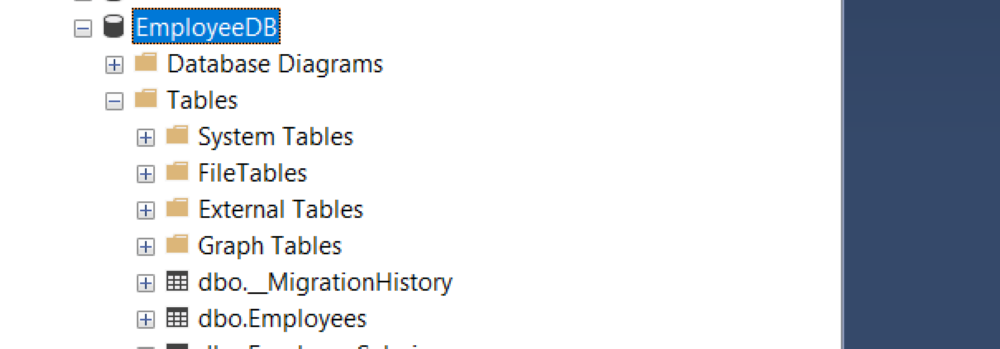
Now check in the database, there will be a table created as per the entity name we have given and also one more table with the name of “__MigrationHistory” as shown below.
Project Demo
As our main goal of creating and updating the database with the code first is achieved, we will perform a CRUD operation to get more idea about how it works
The below code will work for both: code-first and database-first approach. Replace the home controller with the given below code.
using EmployeeManagement.Data.Model;
using EmployeeManagement.Models;
using System;
using System.Collections.Generic;
using System.Data.Entity;
using System.Linq;
using System.Web;
using System.Web.Mvc;
namespace EmployeeManagement.Controllers
{
   public class HomeController : Controller
   {
      public ActionResult Index()
      {
         using (var dBContext = new EmployeeDBContext())
         {
            var employees = dBContext.Employee.ToList();
            var employeelist = new List();
            foreach (var item in employees)
            {
               EmployeeModel model = new EmployeeModel
            {
            Name = item.Name,
            Department = item.Department,
            Id = item.Id
         };
         DateTime now = DateTime.Today;
         int years = now.Year - item.DOB.Year;
         if (now < (item.DOB.AddYears(years)))
            years--;
         int month = 0;
         if (item.DOB.Month > now.Month)
         {
            month = 12 - item.DOB.Month + now.Month;
         }
         else
         {
            month = now.Month - item.DOB.Month;
         }
         int months = now.Month - item.DOB.Month;
         model.DOB = years.ToString() + " Years " + month.ToString() + " Months";
         employeelist.Add(model);
      }
      return View(employeelist);
   }

   public ActionResult Manage(int Id = 0)
   {
      Employee model = new Employee();
      if (Id > 0)
      {
         using (var dBContext = new EmployeeDBContext())
         {
            model = dBContext.Employee.FirstOrDefault(x => x.Id == Id);
         }
      }
      return View(model);
   }

   [HttpPost]
   public ActionResult Manage(Employee model)
   {
      using (var dBContext = new EmployeeDBContext())
      {
         if (model.Id > 0)
         {
            Employee emp = new Employee();
            emp = dBContext.Employee.Find(model.Id);
            emp.Name = model.Name;
            emp.Department = model.Department;
            emp.DOB = model.DOB;
            dBContext.Entry(emp).State = EntityState.Modified;
            dBContext.SaveChanges();
         }
         else
         {
            dBContext.Employee.Add(model);
         }
         dBContext.SaveChanges();
      }
      return RedirectToAction("Index");
   }
   public ActionResult Delete(int Id)
   {
      if (Id > 0)
      {
         using (var dBContext = new EmployeeDBContext())
         {
            var emloyee = dBContext.Employee.FirstOrDefault(x => x.Id == Id);
            if (emloyee != null)
            {
               dBContext.Employee.Remove(emloyee);
               dBContext.SaveChanges();
            }
         }
      }
      return RedirectToAction("Index");
   }
}
Below method is used to manage the specific employee, here passing the specific employee id and it will return the specific view with that employee.
public ActionResult Manage(int Id = 0)
{
   Employee model = new Employee();
   if (Id > 0)
   {
      using (var dBContext = new EmployeeDBContext())
      {
         model = dBContext.Employee.FirstOrDefault(x => x.Id == Id);
      }
   }
   return View(model);
}
Here is other Manage method that is post type and use for insert or update the employee data. if employee available then it will update the record otherwise it insert new data to database.
[HttpPost]
public ActionResult Manage(Employee model)
{
   using (var dBContext = new EmployeeDBContext())
   {
      if (model.Id > 0)
      {
         Employee emp = new Employee();
         emp = dBContext.Employee.Find(model.Id);
         emp.Name = model.Name;
         emp.Department = model.Department;
         emp.DOB = model.DOB;
         dBContext.Entry(emp).State = EntityState.Modified;
         dBContext.SaveChanges();
      }
      else
      {
         dBContext.Employee.Add(model);
      }
      dBContext.SaveChanges();
   }
   return RedirectToAction("Index");
}
The following method is used to delete specific employee. just passing the employee id into that method that’s it.
public ActionResult Delete(int Id)
{
   if (Id > 0)
   {
      using (var dBContext = new EmployeeDBContext())
      {
         var emloyee = dBContext.Employee.FirstOrDefault(x => x.Id == Id);
         if (emloyee != null)
         {
            dBContext.Employee.Remove(emloyee);
            dBContext.SaveChanges();
         }
      }
   }
   return RedirectToAction("Index");
}
Right-click on the Index and Manage method and add views and replace the below code.
Index.cshtml
@model IEnumerable@{ Layout = "~/Views/Shared/_Layout.cshtml"; } Person Details
@if (Model != null && Model.Any()) { foreach (var item in Model) { Name Department DOB Action } } @item.Name @item.Department @item.DOB
Manage.cshtml
@model EmployeeManagement.Data.Model.Employee
@{
Layout = "~/Views/Shared/_Layout.cshtml";
}
Manage Employee
@using (Html.BeginForm("Manage", "Home", FormMethod.Post, new { name = "EmployeeForm" }))
{
@Html.HiddenFor(m => m.Id)
@Html.TextBoxFor(m => m.Name, new { @class = "form-control form-control-sm required", name = "EmpName" })
@Html.ValidationMessageFor(m => m.Name, "", new { @class = "text-danger col-form-label" })
@Html.DropDownListFor(m => m.Department, new List
{
new SelectListItem{ Text="Select Department", Value = "" },
new SelectListItem{ Text="Dot Net", Value = "Dot Net" },
new SelectListItem{ Text="Android", Value = "Android" },
new SelectListItem{ Text="PHP", Value = "PHP" },
}, new { @class = "form-control form-control-sm required", name = "EmpDepartment" })
@Html.ValidationMessageFor(m => m.Department, "", new { @class = "text-danger col-form-label" })
@Html.TextBoxFor(m => m.DOB, new { @class = "form-control form-control-sm datepicker", @AutoComplete = "off", name = "EmpDOB" })
@Html.ValidationMessageFor(m => m.DOB, "", new { @class = "text-danger col-form-label" })
}
@section scripts
{
}
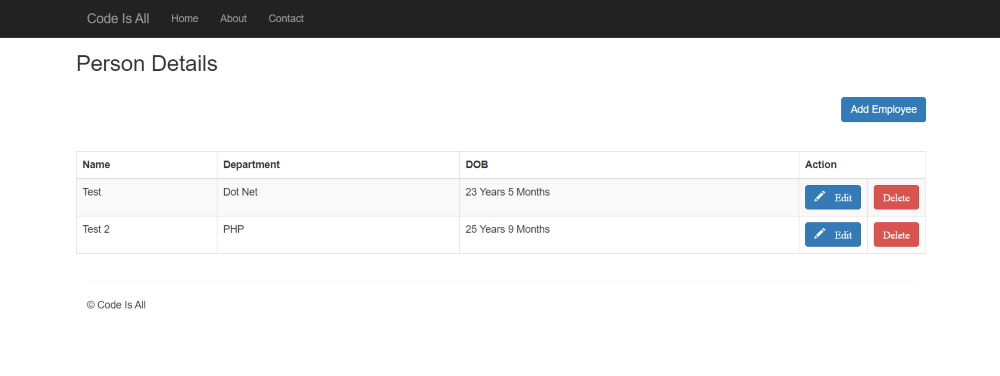
Now run the project and you will get the below screen. where you can add edit and delete the particular record.
Hope this article will help you to Perform code first method to create and update database using code. Comment your suggestions and issues and we will try to resolve it.


